Back in 1974, Richard Lester’s The Three Musketeers didn’t just bring Alexandre Dumas to the screen. It gave us a vision of prerevolutionary excess so dense it felt tangible. Raquel Welch and Michael York ran through French countryside, but the real star was the setting’s sheer, unapologetic extravagance. Consider the chess scene. King Louis XIII doesn’t sit at a table. He plays on a king-sized board carved directly into the manicured lawns of Versailles. The pieces? Great Danes and Dalmatians, standing in for pawns and knights.
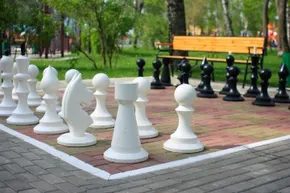
It looks like a fantasy reserved for make-believe monarchs with endless staffs. It isn’t. You can have your own oversized board. Not the cheap plastic ones you drag to the park. We are talking about permanent, life-size installations. From affordable housing complexes in New York to public parks in Scotland, giants chess sets are popping up everywhere. In Scotland, kids are actually moving pieces nearly their own height to fight obesity. On Long Island, an Arbor House complex features a fitness park with four-foot-tall pieces.
You don’t need a palace to join in. You just need some ingenuity, a credit card, or a lawnmower. Let’s start with the grass.
The Grass Game
If you have a tape measure and aren’t afraid of a ride-on mower, mowing a chessboard into your lawn is the ultimate DIY flex. It’s technically called “striping,” the same trick turf pros use on football fields. You bend the grass blades one way or another to catch the light differently. Dark stripes. Light stripes. Eight by eight grid.
But you can’t just hit start. First, figure out your scale. Your mower swath dictates your square size. A 24-inch mower means two-foot-by-two-foot squares. Go bigger with a 36-inch mower, and your squares jump to three feet. Measure your perimeter. Stake the corners with batter boards. Tie a mason’s line between them.
Here is where people mess up. They assume stakes are square. They aren’t. Use the 3-4-5 triangle method. Pick a point three feet from a corner on one line and four feet on the other. The distance between those points must be exactly five feet. If it’s not, adjust the boards. Do this for every corner. Check your levels with a water level or line level. If it’s not plumb, the whole board tilts.
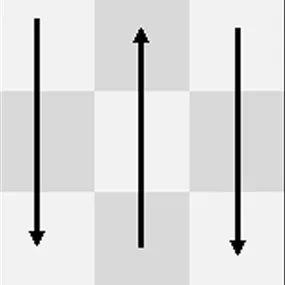
Once the geometry holds, fire up the mower. Cut the perimeter first, following the outside of your mason’s lines. Then, mow the inside. Alternate directions. One row north to south. The next south to north. The contrast creates the illusion of squares.
It’s simple. It’s effective. It’s also incredibly rigid. What happens when you want to play? You need pieces that don’t blow away in a breeze.

The Lawn Pattern: Precision and Protection
Stop mowing in straight lines. If you want a lawn that looks like it was drafted by an engineer, you have to watch your corners. Experts swear by the “Y” turn. It sounds specific, but it’s the only way to avoid tearing up the turf when you switch from one row to the next. A sharp ninety-degree turn rips the grass. A gradual “Y” keeps the blades intact.
Then comes the visual trick. You’re building a chessboard, so the stripes need to fight each other. If your first pass went north to south, the next section has to go east to west. This cross-hatching is what creates that optical depth. It’s not just mowing. It’s layering.
Finish by running the mower along the perimeter one last time. This cleans up the edges and erases any stray stripes that bled into the wrong zone.
Go Bold with Paint
Want the board to pop? Add color. This isn’t about aesthetics alone. It’s about visibility. You need lawn paint made by World Class Athletic Surfaces. That’s the same stuff they use in major sports stadiums to paint those complex field designs. The formula is engineered to cover the grass while letting sunlight reach the blades. The grass keeps growing. The color stays put.
Pick two colors. Paint one set of squares. Paint the other set differently. Do not use household paint. That stuff suffocates the grass. It kills the lawn. Stick to the athletic-grade stuff or you’ll end up with a dead, discolored mess instead of a checkerboard.
Skip the Grass, Buy the Board
If cutting into your lawn feels like too much work, drop the mowing pattern entirely. Just buy a life-size board. Treat it like a rug. Lay it down.
You have options. There are chess blankets. Nylon boards with 12-inch or 24-inch squares. Or rubberized vinyl tiles. Think heavy-duty gym flooring. These clip together. They’re modular. When you’re done playing, you roll them up and cart them away. No turf damage. No mowing patterns. Just a game.
The Tools You Actually Need
You don’t need a PhD in construction to lay out a perfect grid. You just need two specific things.
- Batter board : This is a horizontal board nailed to a post in the corner of your project. It’s not decorative. It’s a reference point. You use it to figure out the levels and outlines. If your board is off, your lines are off.
- Mason’s line : This is a string or cord that doesn’t stretch. When you’re trying to align something over a large area, elastic string is useless. You need taut, non-stretch line to keep your rows straight.
The Patio Chessboard

If your yard is too cramped for a full-scale game, look at your patio. Or better yet, transform it.
The size of your base material matters. Patio blocks vary wildly. You might find 16-inch squares. Or you could encounter massive 10-foot slabs. Math becomes your best friend here. Calculate the exact footprint you need. Paint the blocks to match before you even start stacking them.
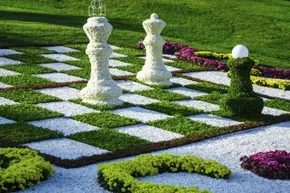
But if you’re ready to commit to a permanent installation, skip the modular blocks. Try building a concrete and sod chessboard from scratch. This method, adapted from DIY Network experts, offers a sturdier, more custom solution.
Framing the Foundation
Start with the perimeter. You need a 16-by-16-foot square. Use 2×4 lumber to frame the outer edge. This length allows for eight 2×2 foot squares along each side.
Once the frame is secure, dig out the soil inside by two inches. This depth gives the concrete enough room to set without heaving.
Next, set up your grid. Drive screws into the top of the perimeter frame every two feet. Tie a string to these screws. Run the strings across the board to create a visual grid. Do this horizontally and vertically.
Installing the Inner Frames
This is the tedious part. You need to build 32 smaller wooden frames. Each one must measure exactly 4 square feet. Accuracy is non-negotiable. You are pouring concrete into these boxes later.
Start in a corner. Place the first small frame against the perimeter. Work outward.
Drive stakes into the ground on the inside of each small frame. One on each side. Raise the frame until its top aligns with your string grid. Screw the stakes into the perimeter frame to lock the height in place.
Repeat this process. Use the string lines to ensure every frame sits in the correct “space.” Remember, you’re only placing frames in alternating squares. The other squares will remain open for concrete.
Pouring and Planting
When the frames are secured, it’s time for concrete. Pour the mix into the open squares—the ones without stakes.
Trowel the tops smooth. You have options for texture. Use a color hardener for a tinted finish. Or drag a stiff broom across the wet surface for a non-slip grip. You can also paint the concrete after it cures. Remove the wooden frames about 24 hours later.
Now for the grass. Lay sod in the remaining open spaces. Trim the pieces so they fit snugly against the concrete. Ensure every bit of sod touches the soil beneath.
The Pieces
A board is useless without players. Each side needs 16 pieces.
- Eight pawns
- Two rooks
- Two knights
- Two bishops
- One queen
- One king
You can buy life-size sets. Resin and plastic are common. Wood looks classic but requires maintenance. Or, if you have enough dogs, let them play the pawns. Just make sure they don’t eat the knights.
Which material will you choose? Concrete looks stark and modern. Wood feels traditional. The choice defines the game before the first move is made.