You’ve got the basics down. You’ve cleared the intermediate hurdles. Now you’re staring at the wall of advanced yo-yo tricks, and it looks intimidating. It should. These aren’t just parlor games anymore. They are feats of dexterity that blur the line between toy and instrument. And yes, they are fun to watch. They are even more fun to pull off when you actually nail them.
The learning curve here is steep. Expect to fail a lot. The advanced yo-yo tricks listed below require muscle memory, patience, and a willingness to look foolish in front of your mirror for hours. Don’t quit when the string tangles or the yo-yo bites your knuckles. Keep trying. The payoff isn’t just personal satisfaction. It’s the look on your audience’s faces when you pull off something they didn’t think was possible.
Below is the lineup of moves that will make you look less like a kid in a basement and more like a pro at a talent show.
Texas Star Yo-Yo Trick
Every show needs a theme. If you are rocking the Texas vibe, you need the Texas Star Yo-Yo Trick. It’s a visual centerpiece. You aren’t just swinging a weight on a string; you are sculpting geometry in mid-air. The goal is to shape the string into a perfect five-pointed star. It honors the great state of Texas and looks sharp. It’s not the hardest trick in the book, but it sets the stage for complexity. You need precision here. Sloppy lines kill the illusion.
One-Handed Star Yo-Yo Trick
Why use two hands when one will do? The One-Handed Star Yo-Yo Trick strips away the crutch of your non-dominant hand. This is pure skill. You create the star shape using only your throwing arm. It forces better wrist control and a tighter string loop. If you can pull this off cleanly, you prove you aren’t relying on balance. You are relying on technique.
Through the Tunnel Yo-Yo Trick
“Walk the dog” is where most people get comfortable. It’s safe. It’s boring. The Through the Tunnel Yo-Yo Trick is a variation that sends your yo-yo right through a tunnel formed by your own arms. It looks like magic because the yo-yo disappears and reappears. It requires timing. You have to create the tunnel wide enough for the yo-yo to pass without hitting your elbows, but tight enough to maintain tension. Miss the timing, and you slap yourself in the face.
Rattlesnake Yo-Yo Trick
Sound matters in yo-yo. It adds a layer of performance. The Rattlesnake Yo-Yo Trick isn’t just visual. It’s auditory. You make the yo-yo rattle. It mimics the hiss and shake of a desert predator. Crowd-pleaser? Absolutely. It turns a silent plastic disk into something alive. The technique involves specific wrist flicks and string manipulation that create the vibration. Practice the sound as much as the movement.
Shoot the Moon Yo-Yo Trick
Warning: this one bites. The Shoot the Moon Yo-Yo Trick can be dangerous if you are sloppy. It sends the yo-yo high into the air, often out of frame. When done correctly, it’s spectacular. The yo-yo becomes a distant speck before snapping back. The risk? String tangling at the apex or the yo

The Texas Star Yo-Yo Trick: A Guide to the Ursa Major
The Texas Star isn’t just a pretty name. It’s one of those classic string formation tricks that makes people stare at their hands, trying to figure out where the rest of the yo-yo went. It’s also known as the Ursa Major. Big Dipper energy, but with more string.
Here is how you pull off the illusion of a shining star in Texas.
Step 1: The Grip
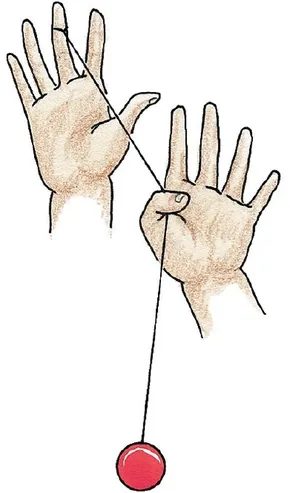
Start by grabbing the string. Use the thumb of your non-dominant hand. This is the free hand. Pinch the string about four to eight inches from the finger-looped end. That is the part attached to the yo-yo.
Don’t pull tight yet. Just hold it. You are creating a loop. A small one. The tension comes later. For now, focus on the pinch. If your grip is loose, the trick fails before it starts. If it is too tight, you restrict the string’s movement. Aim for firm but fluid.
This specific hold is the foundation. Without it, you cannot form the star’s points. The string must be anchored correctly to create the geometry needed for the rest of the trick.

The Regal Catch: How to Secure Your First String Trick
Most beginners assume the string is just a tether. It’s not. It’s a lever. And if you aren’t gripping it correctly after the drop, your yo-yo becomes a projectile. You have to catch it. Not with your palm—never your palm—but with a specific finger configuration that feels awkward until it clicks.
Here is the mechanics of the Regal catch, the foundational move for nearly every string trick in existence.
The Setup: Trusting the Drop
You’ve thrown. The yo-yo is sleeping at the bottom of the string. Your free hand is up. Your yo-yo hand is down. Now comes the part where people mess up. They reach for the string with their fingers like they’re picking up a coin. Wrong.
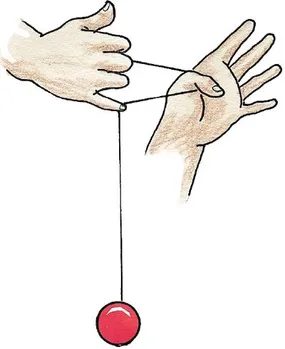
Swing your yo-yo hand down. Don’t yank it. Just let gravity do the work. The string needs to lay across the back of your free hand. You’re aiming to catch that slack string four to eight inches below the thumb of your free hand.
That distance matters. Too high? You’re grabbing the tension line. Too low? You’re grabbing the dead weight. Four to eight inches is the sweet spot. It’s the margin of error where the string has enough slack to loop but enough tension to hold.
The Finger Placement: Ring or Pinky
You don’t use your index finger. You don’t use your middle finger. Those fingers are busy holding the yo-yo’s body or preparing for the next move. You use the ring finger or the pinky.
Why? Because those fingers are weak. They’re designed for precision, not power. By catching the string with the ring or pinky, you create a loose loop. A tight loop means the yo-yo is still in your hand’s grip, which defeats the purpose of a string trick. A loose loop means the yo-yo is hanging, free, and waiting for your next command.
“The catch isn’t about stopping the yo-yo. It’s about giving it freedom.”
The Mechanics: The Thumb as the Anchor
Your free hand’s thumb is the anchor. The string passes below it. This creates a shelf. The string rests there, held in place by the friction against your thumb and the tension of the yo-yo below.
When you catch the string with your ring or pinky finger, you’re not just grabbing a line. You’re creating a pivot point. The string loops around your finger. The yo-yo hangs. The free hand stabilizes the angle.
This is where the geometry of the trick lives. If your thumb is too low, the string slips. If it’s too high, the string kinks. Keep the thumb extended, firm, and acting as a pulley. The string should slide smoothly under it if you pull it back, but stay put when you’re ready to transition.
Common Mistakes: Why Your Tricks Fail
- Too Much Tension : If you’re pulling up with your free hand, you’ve lost the slack. The yo-yo won’t sleep. It will climb back up the string like a confused squirrel. You need that four-to-eight-inch buffer. Let it drop.
- Wrong Finger : Using the index finger creates a tight noose. The yo
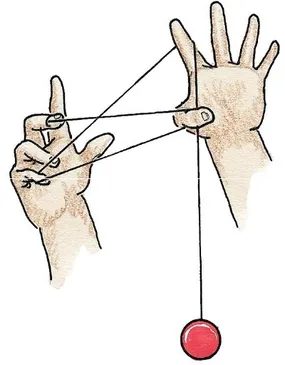

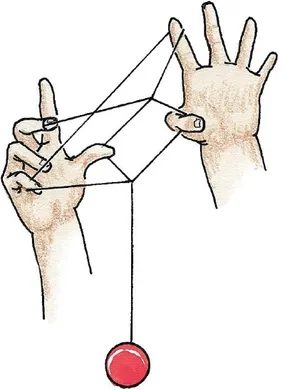

Mastering the Thumb Loop
The string wants to be a triangle. You have to make it one.
Take your free hand. Let it drop. Swing it down until the string loops over the top of your forefinger. It’s a simple motion but it changes everything. The tension shifts. The geometry locks in.
Now look at your dominant hand. That’s the yo-yo hand. It’s holding the loop. You need to feed your thumb through that string triangle you just created with the other hand. Don’t force it. Slide it in.
Here’s where people mess up. They just poke. You don’t poke. You hook.
Use the back of your thumb. Catch the hanging string. Pull it back through the triangle.
This isn’t just about getting the string around your finger. It’s about setting up the next trick. If you pull too hard, you break the loop. If you pull too slow, it gets tangled. Find the resistance. Feel where the string bites.
The key is to let the string find its natural tension before you pull it through.
Once that string is hooked, you’re ready for the next move. Don’t stop. Keep the momentum.
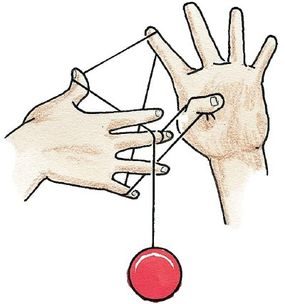

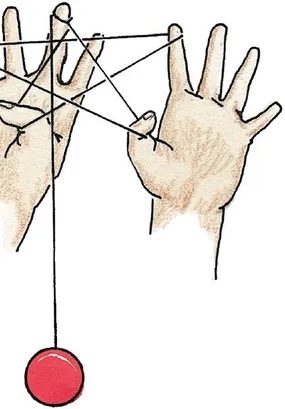

The Finish
Reach down with your yo-yo finger and drag the string a few inches upward using the back of that same digit. It’s a subtle tug, not a yank. Once the tension is set, open both hands wide.
Let the geometry do its work. The string snaps into a star-shaped lattice suspended between your palms. That is the Texas Star. Done.
One-Handed Star Yo-Yo Trick
If you prefer keeping it simple, the One-Handed Star trick creates that same star formation but relies on a single hand’s dexterity rather than the two-handed stretch. It’s a different angle on the same string-art logic.
Master the Basics First
Before you try this at a party or a yo-yo meetup, you need to build muscle memory.
- Yo-Yo Basics : Understand how the string loops around the axle.
- Easy Yo-Yo Tricks : Get comfortable with the sleeper and the return.
- Intermediate Yo-Yo Tricks : Add complexity only when the easy stuff feels boring.
- Kids Activities : Great for younger hands learning fine motor control.
Yo-Yo Tip
Start with a “dead” yo-yo. One that isn’t spinning. It’s easier to manipulate the string without the chaos of momentum fighting you.
When the hand movements become automatic—when you can do it while watching TV—then introduce the Sleeper. A fast, spinning yo-yo adds chaos. It rewards precision and punishes hesitation.
Which path will you take first? The static practice or the spinning challenge? The star waits for no one.
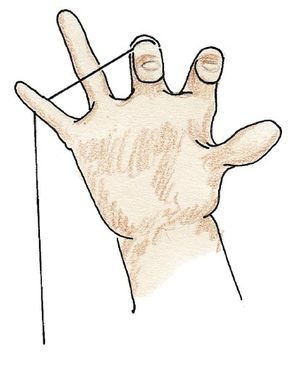

The One-Handed Star: Mastering Ursa Minor
Forget the two-handed gymnastics you just practiced. It’s time to isolate the movement. The One-Handed Star—also known as Ursa Minor —is all about single-handed control and precise string geometry. You aren’t swinging wildly here. You’re building a shape with tension and finger placement.
Step 1
Start with your yo-yo hand held upright. Keep it still. Let the string hang straight down from the middle finger. This is your anchor point. Now, take your little finger. Slip it inside the loop of the string. Don’t pull tight yet. Just let the finger sit inside the loop to create the base structure.
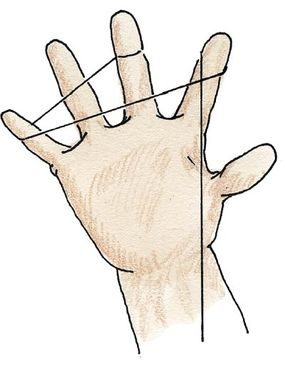

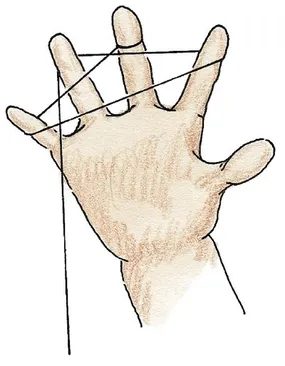

Fingerwork Basics
Once you have the string in place, stop treating it like a static object. You need to engage with it.
Turn your hand just slightly. It’s a small movement, but it changes everything. Slip your forefinger under the string. Don’t yank. Just get the digit underneath.
Then comes the tricky part. Twist your hand in the opposite direction. Feel that tension? Good. Loop the string around your ring finger.
It sounds simple until your fingers get tangled. Which they will.
“Precision matters more than speed here.”
Keep your movements small. Large gestures only lead to knots.
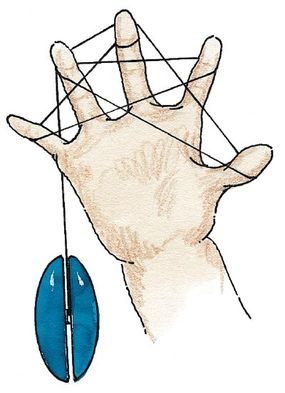

The Star Formation and Final Reveal
Flip your hand over. This is where the geometry gets tricky. Loop the string around your thumb one more time, then twist your wrist downward. You are fishing for the string now, aiming to catch it with your middle finger. Once you pull that loop into place, you have officially formed the small star shape. Open your hand slowly. Let the yo-yo settle. There it is. A perfect little star hanging from the string.
It feels simple when you see it done. It is not. The tension has to be just right. If you pull too hard, the star collapses. If you don’t pull enough, it just looks like a tangled mess.
Moving to “Through the Tunnel”
Once you have the star down, you might want to advance. The next move on the list is the Through the Tunnel trick. Think of it as a cousin to the classic “Walk the Dog.” It uses similar mechanics but adds a layer of complexity. You are basically threading the needle with your wrist motion. It requires more precision than the star. You cannot muscle this one. You have to finesse it.
How to Practice Without Frustration
Here is the trick nobody tells beginners: do not start with a spinning yo-yo.
Find a “dead” yo-yo. This is a yo-yo that does not spin freely. It is heavy, stable, and unresponsive. It will not wake up and start spinning on its own. Practice the hand movements with this dead weight. Learn the angles. Feel the string tension. Memorize the path your hand needs to take.
Once your muscle memory is locked in, switch to a fast sleeper. A sleeper is a yo-yo designed to spin at the bottom of the string for a long time. This is where the real magic happens. The motion you learned with the dead yo-yo now interacts with the spin. It becomes fluid. It becomes a trick instead of a puzzle.
Where to Go Next
If you are stuck on the basics, go back. Review the fundamentals. If the star feels easy, you are ready for the intermediate list.
- Yo-Yo Basics : The foundation. Do not skip this if you are still struggling with the throw.
- Easy Yo-Yo Tricks : Simple moves that build confidence.
- Intermediate Yo-Yo Tricks : This is where the Through the Tunnel trick lives. It is harder. It requires practice.
- Kids Activities : Sometimes the simplest instructions come from the best teachers. Look for tutorials designed for younger hands. They often break down movements in clearer, less technical terms.
The yo-yo is a tool. It is also a test of patience. Most people give up after the first five minutes. They expect instant mastery. It does not work that way. You have to be willing to fail. You have to be willing to untangle the string. But if you stick with it, the star appears. The tunnel opens. The yo-yo responds.
What happens when you add a second string to the mix? That is a problem for another day.
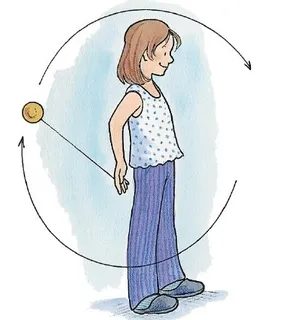

The Through the Tunnel yo-yo trick. It’s a move that looks like you’re sending your toy through a literal tunnel, not just walking your dog. Don’t underestimate it. It’s tricky.
Breaking Down the Throw
Start with your throwing hand positioned exactly like you are about to perform a standard Throw Down. This is the setup. The deception is key.
Instead of dropping the yo-yo into the loop, throw it down hard. Then swing it backward. Ease into an Around the World backward motion. The transition needs to be smooth. If you jerk it, the yo-yo will likely collide with your hand or the string will tangle. You are essentially building momentum for the reverse orbit while setting up the angle for the tunnel pass.
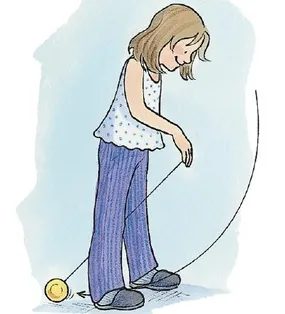

Step 2: As the yo-yo swings around to the front, spread your feet about two feet apart. Let it pass right through your legs. Then, gently let it touch down on the ground behind you.
Step 3: Walk the yo-yo along the floor back toward your hand.
When you pull off this Rattlesnake Yo-Yo Trick, the toy will look and sound exactly like a rattlesnake. Read about this yo-yo trick on the next page.
Want to learn more yo-yo tricks? See:
-
Yo-Yo Basics
-
Easy Yo-Yo Tricks
-
Intermediate Yo-Yo Tricks
-
Kids Activities
Yo-Yo Tip
This trick is called a Combination Trick, because it combines the elements of several tricks.
Rattlesnake Yo-Yo Trick
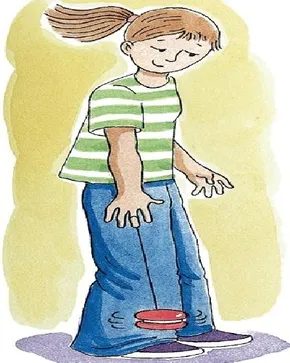

The Rattlesnake Yo-Yo Trick Explained
“This one doesn’t bite.”
If you are going to pull off the Rattlesnake Yo-Yo Trick, you have to sell the bit. Tell your audience to watch out. It walks. It talks. It sounds like a venomous reptile on the loose. But rest easy. You are holding a piece of plastic and string.
The trick is simpler than the danger implies. Especially if you are wearing loose pants. The fabric gives you room to maneuver without the string tangling around your ankles or catching on tight denim.
How to execute the move
Start with a Sleeper. This is the foundation. Throw it with a sideways motion. Think of it like the “Sleeping Beauty” maneuver. You are aiming for that deep, spinning sleep state at the end of the string.
Once it hits that spin, do not reach for it. This is where most people fail.
Instead of picking up the yo-yo with your free hand, let it sit there. Let it spin on its side. It stays aloft. It defies gravity for a few seconds. That is the moment. That is the rattlesnake waking up.
Why the sideways spin matters
You might wonder why you don’t just catch it. The sideways spin creates the visual chaos. It looks unstable. It looks wild. That is what sells the illusion of a snake thrashing around. If you catch it too soon, the trick ends before it begins.
Let it ride the edge of the string. Keep your eye on it. The loose pants help you move freely if you need to adjust your stance. But the key is patience. Don’t rush to the catch.
Common mistakes to avoid
- Wearing skinny jeans: They restrict movement. You need space.
- Picking up too early: You kill the spin. The trick dies.
- Not warning the audience: Without the scare factor, it is just a yo-yo trick.
The Rattlesnake Yo-Yo Trick is about timing. And attitude. Make them believe they are looking at a live creature. Then reveal the trick. The relief in their faces is worth it.
Does it actually work? Yes. But only if you let the yo-yo breathe.
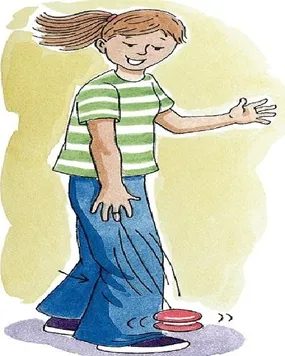

How to Execute the “Shoot the Moon” Yo-Yo Trick
That final leg movement is the make-or-break moment. Swing your leg back just enough so the flailing string catches your pant leg. You want to hear a sharp rattle as the cord strikes the fabric. It’s not just about contact; it’s about that specific sound confirming the string is in the right place.
This maneuver isn’t for beginners. The Shoot the Moon yo-yo trick has a reputation for being dangerous. Serious injuries can happen if you lose control. Only attempt this if you’re already confident in your fundamental skills.
Want to learn more yo-yo tricks? See:
- Yo-Yo Basics
- Easy Yo-Yo Tricks
- Intermediate Yo-Yo Tricks
- Kids Activities
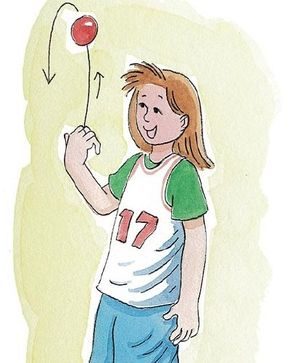
Skipping straight to the advanced stuff? Good luck with that. The Shoot the Moon Yo-Yo trick is where beginners go to lose eyebrows. It’s not just a cool photo op. It’s a genuine hazard if you haven’t earned your stripes first. You need solid control. You need to have crushed the basic tricks. Otherwise, you’re just throwing expensive plastic at your face.
The Mechanics of the Flip
Start with a standard Forward Pass. This is non-negotiable. You can’t skip the fundamentals.
The Wrist Flick and Risk Factor
Here is where it gets tricky. As the yo-yo wakes up and starts returning, you don’t just catch it. You flick your wrist. A quick, semicircular motion. Send it nearly straight up. Past your head. Into the sky.
The yo-yo drops back down. Right past your face. Inches from your nose. This proximity is why the Shoot the Moon yo-yo has a reputation for danger. One slip. One bad flick. And you’re looking at a black eye or a split lip.
“Be careful. The margin for error here is almost zero.”
Don’t attempt this yo-yo trick until you can sleep with your eyes closed and still throw a perfect sleeper. If you can’t do that, stick to the basics. The moon isn’t going anywhere.
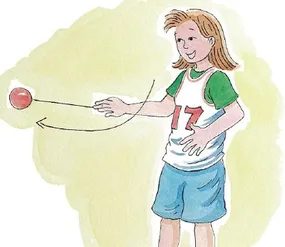

Mastering the Elephant’s Trunk Yo-Yo Trick
The magic happens when the yo-yo hits the bottom. Flick that wrist forward. Send the string shooting out in front of you. It’s a sharp motion. Quick. Precise.
Now watch it come back. You have two choices here. Catch it. Simple. Clean. Or go for the moon shot. Flick it upward one more time. Add a second bounce to the routine.
You aren’t doing this standing on open floor. You need a chair. It’s part of the setup. The trick relies on that anchor point. Without it, the Elephant’s Trunk trick falls apart.
Want to build your repertoire beyond this? Look into the foundational moves first.
- Yo-Yo Basics : Start here. Don’t skip it.
- Easy Yo-Yo Tricks : Step up the difficulty slightly.
- Intermediate Yo-Yo Tricks : For when you’re ready to commit.
- Kids Activities : A good refresher on the fundamentals.
The next page breaks down the specific mechanics. How to position the chair. Where the string catches. The details matter.
How to Perform the Elephant’s Trunk Yo-Yo Trick
The Elephant’s Trunk Yo-Yo trick is all about precision and a bit of theatrical flair. If you can manage to make a convincing elephant sound while you’re at it, you’ve already leveled up your performance.
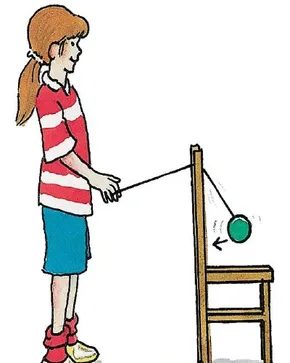
Start by positioning a lightweight chair about two or three feet in front of you. Face away from the chair so the backrest is directly in your path. This setup is critical for the trick to work.
Next, throw a fast Sleeper. You want maximum spin here.
Once the yo-yo is spinning smoothly at the bottom of the string, swing it outward. Guide it so it rests on the back of the chair. It needs to balance there while still spinning. If you pull it off correctly, you’ve created the illusion of an elephant’s trunk hanging down.
To finish, give a sharp jerk on the string to bring the yo-yo back into your hand.
Why This Trick Works
The trick relies on the yo-yo maintaining its rotational momentum. When the yo-yo lands on the chair’s back, it doesn’t stop; it just changes position. The key is getting the Sleeper fast enough to stay balanced on the narrow edge of the chair.
Safety First
You can also try this with an assistant’s outstretched arm instead of a chair. But don’t attempt this unless you have demonstrated full control. If you lose the yo-yo mid-trick, you could hit your friend in the face. It’s not worth the bruised ego.
What’s Next?
Once you’ve got the Elephant’s Trunk down, you might be ready to look toward the stars. The Skyrocket Yo-Yo trick teaches you how to send your yo-yo blasting off toward outer space. Learn this yo-yo trick on the next page.
Want to Learn More Yo-Yo Tricks?
- Yo-Yo Basics
- Easy Yo-Yo Tricks
- Intermediate Yo-Yo Tricks
- Kids Activities
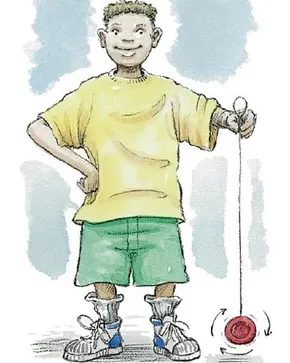
How to Execute the Skyrocket Yo-Yo Trick Step by Step
The Skyrocket isn’t just a name. It’s a vibe. You want that feeling of launching into the void? This trick delivers. It’s fast. It’s loud. And it looks like the yo-yo is actually fighting gravity.
Here is how you get there.
Step 1: The Fast Sleeper
You need speed. A slow sleeper won’t cut it. You have to throw the yo-yo as hard as you can while maintaining perfect balance. If it wobbles, you’re done before you start.
Get it spinning. Deep. Fast.
Step 2: The String Transfer
This is the tricky part. While the yo-yo is still sleeping, look at your throwing hand. The string is looped around your index finger. You need to get it off.
Use your non-throwing hand. Grab the string just below the loop. Pull it free from your finger.
Keep the tension. If you drop the string, the trick fails. You need to hold that line taut with your free hand.
It feels counterintuitive. You’re letting go with your main hand to catch it with the other. Do it smoothly. No jerking. Just a clean transfer.
Once your free hand has the string, you’re positioned. The yo-yo is still spinning at the bottom. You’re ready for the next move.

The Launch
Here is where things get physical. You aren’t just tossing a toy anymore. You are launching a projectile.
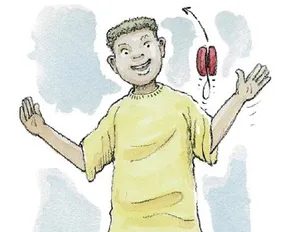
Jerk the string straight up.
Do it hard.
The moment your yo-yo passes your hand, let go of the tension. Don’t hold back. Let it fly. It will blast off like a skyrocket. If you hesitate, you’ll just yank your own wrist. That hurts.
Pull both hands back immediately.
Clear the way.
You need space. The yo-yo is going to trace a wild arc. You don’t want it catching your fingers or elbow. Clear the zone. Watch it spin away from you.
It’s fast. It’s chaotic. And if you timed it right? It’s beautiful.
Why does it fly like that?
Simple physics. You built up momentum in the loop. You released the hold at the exact peak of the swing. Gravity takes over. The string unspools rapidly. The yo-yo converts that spin into vertical lift.
It’s not magic. It’s just timing.
Most people mess this up because they pull too early. Or too late. The sweet spot is right as the yo-yo crosses your midline. Let it pass. Then go.
Keep your hands wide.
Let the yo-yo do its thing.
Don’t try to catch it yet. Let it complete its run. You’ll know it’s ready when it starts slowing down. When the spin drops. That’s your cue.
But for now? Just watch.
It’s hypnotic.
The string hums. The yo-yo dips. The air rushes past it.
You’re not just playing. You’re conducting.
One mistake and you lose the trick. One second of focus and it soars.
Which way should you pull?
Up. Always up.
Don’t pull sideways. That’s for different tricks. For the skyrocket? Vertical force. Pure upward energy.
It’s a specific motion.
Not a throw. Not a flick. A jerk.
Distinct. Sharp. Final.
Once the yo-yo is in the air, you’re done.
Your hands are just guides now.
Let it go.
Watch it climb.
See how far it goes?
That’s the point.
Not to catch it. But to see it fly.
For a second.
Just a second.
It’s gone.
Then it’s back.
Can you see it coming?
Get ready.
Hands back.
Eyes up.
Wait for it.
There.
It’s landing.
Or it’s not.
You’ll find out quickly.
Either way, it’s over.
Try again.
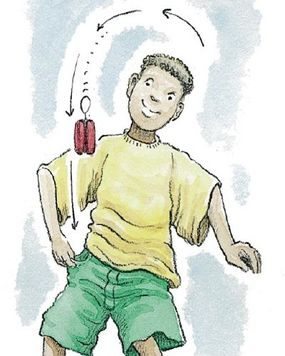
Catching a spinning disc mid-air feels like magic. The Man on the Flying Trapeze is a high-risk, high-reward maneuver that demands precision. You send the yo-yo flying in a whole new direction. Then you wait.
Your hand becomes the landing zone.
The Splash Down
Once the yo-yo begins its descent, you have a split second to react. Have it “splash down” right into your palm. It requires timing. Too early, and you fumble. Too late, and you lose the string tension entirely.
If you want to show off a bit, try catching it in your pant’s pocket. Yes, really. It’s a flashy move that distracts from the actual skill involved. But it works if you’ve got the coordination.
Why This Trick Matters
This isn’t just about spinning plastic anymore. It’s about geometry. You’re sending the yo-yo across a wide arc. The string stretches. The yo-yo rotates on its axis. You are essentially creating a human trapeze act. The yo-yo is the performer. You are the net.
The Wooden Era Context
Before modern plastics dominated the market, yo-yos were serious craftsmanship. In the mid-1950s, the best-selling yo-yos were made of wood. They weren’t cheap toys. They were items to be customized.
Yo-yo demonstrators learned the art of “yo-yo carving.” They carried special woodcutting knives or regular pocket knives to every event. They would customize each child’s yo-yo with beach scenes, birds, and other fun examples of carved figures. They’d even include the child’s name. It was personal. It was art.
Today, we trade carvings for complex string tricks. The Man on the Flying Trapeze is the modern equivalent of those custom wooden designs. It’s unique. It’s difficult. And it looks incredible when you nail the splash down.
Want to learn more yo-yo tricks? See:
-
Yo-Yo Basics
-
Easy Yo-Yo Tricks
-
Intermediate Yo-Yo Tricks
-
Kids Activities

The Man on the Flying Trapeze isn’t just a trick. It’s a statement.
It’s widely considered one of the most difficult advanced yo-yo maneuvers out there. If you want to pull this off, you’re looking at serious practice. It requires the precision of a daring circus performer. One slip and the whole illusion collapses.
So, how do you actually land it?
The Setup
You need a breakaway yo-yo for this specific trick. Standard fixed axles won’t cut it.
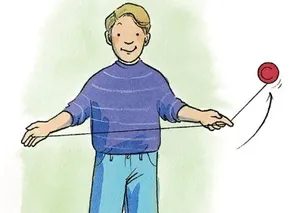
Step 1 is all about the throw. Launch the yo-yo so it swings in an upside-down arc directly in front of your body. Don’t overthink the angle. Just get it moving. Keep the string taut but loose enough to allow movement.
The Finger Strike
Here’s where most people fail.
Step 2 happens when the yo-yo begins its rise on the opposite side of your body. This is the critical moment.
Extend the index finger of your free hand. Aim it at the string. You need to strike the string about three to five inches away from the yo-yo itself.
Why that distance? Too close and you’ll knock it off axis. Too far and you won’t have the leverage to loop it.
Allow the yo-yo to loop over your outstretched finger. It should catch. It should climb.
If the yo-yo doesn’t loop, your timing is off. If it drops, your finger placement was too high or too low.
“This trick demands patience. You aren’t just throwing a yo-yo. You’re choreographing a flight.”
It’s not about strength. It’s about geometry and timing. The finger acts as a pivot point. The yo-yo uses momentum to climb the string.
Keep practicing. The learning curve is steep. But when it finally loops? It’s magic.
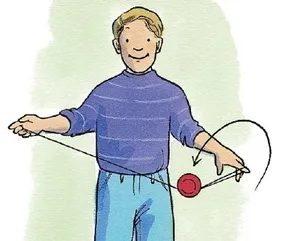

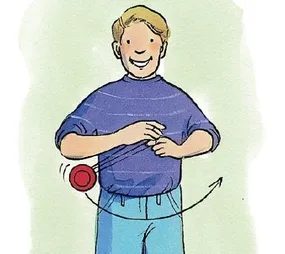

Once you have the yo-yo spinning steadily at the end of its string, you need to let it swing around your outstretched finger. Don’t force it. Just let the momentum take over, guiding the arc until the yo-yo lands squarely on the string itself. This creates a stable pivot point.
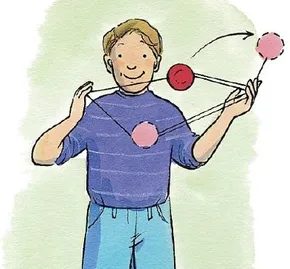
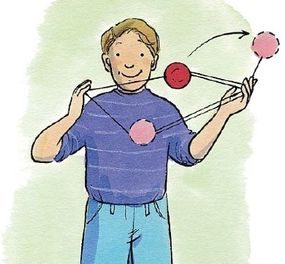
With the yo-yo “sleeping” on the string, the real fun begins. Push your hands together quickly. This sudden motion traps the yo-yo between your palms. It swings back and forth in a tight, rapid rhythm. Fans call this the “trapeze” style. It looks simple. It requires precise timing. If you hesitate, the yo-yo might slip off or lose its spin. But get the timing right and you’ll have a mesmerizing display of physics and dexterity.
The key to the trapeze move is speed. Push your hands together fast enough to catch the yo-yo before it swings too wide.
This trick isn’t just about showing off. It teaches you how to control the yo-yo’s energy. By adjusting the angle of your hands and the speed of your push, you change the height and intensity of the swing. It’s a great way to transition between other tricks or just to enjoy the visual flair.
Try it slowly at first. Focus on getting the yo-yo to land on the string cleanly. Once that feels natural, increase the speed of your hand movement. The goal is a smooth, rhythmic oscillation. Not a chaotic flail.
Why do people love this specific move? It’s visual poetry. The yo-yo becomes a pendulum of light and motion. It draws the eye. It holds attention. And for you, the player, it’s a sense of accomplishment. You’ve tamed a spinning disk of plastic and string. You’ve made it dance.
Keep practicing. Your fingers will get faster. Your eyes will get sharper. And soon, you’ll be doing this without even thinking about it. That’s when it becomes art.

The Final Move to Complete the Trick
To finish the maneuver and bring it home, you have to act fast. Pull your hands apart in one quick motion. This sudden tension sends the yo-yo flying upward. It arcs over the forefinger of your free hand. Then it winds up tight. Finally, it returns directly to your yo-yo hand. If you timed it right, you have successfully executed the trick.
Is It Worth the Effort?
The Double or Nothing Yo-Yo Trick raises the stakes significantly. It builds directly on the foundation of “The Man on the Flying Trapeze.” You need to know that trick first. If you are confident in your skills and ready for a higher challenge, go for it. If not, there is plenty of ground to cover elsewhere.
Where to Start Your Yo-Yo Journey
If you want to improve your skills before attempting advanced moves, check out these resources:
- Yo-Yo Basics: The absolute fundamentals you cannot skip.
- Easy Yo-Yo Tricks: Simple moves to build confidence.
- Intermediate Yo-Yo Tricks: The bridge to advanced techniques.
- Kids Activities: Fun ways for beginners to start.
The Truth About Practice
Yo-Yo Tip
Practice, practice, practice!
This is a difficult trick to master. It requires specific muscle memory and timing. You will eventually get it, but don’t expect it on the first try. All it takes is determination. Do not give up after a few failures. The struggle is part of the process.
Why the Double or Nothing Might Be Easier Than It Looks
Forget everything you think you know about yo-yo physics. Seriously. You have just conquered the Man on the Flying Trapeze. Your fingers are burned, your string is frayed, and you feel like a circus prodigy. So naturally, the logical next step is to attempt the Double or Nothing yo-yo trick.
Here is the shocker: it is actually slightly easier.
Yes. Easier.
The internet lies to you. The forums whisper that yo-yo tricks are a hierarchy of pain, where each new move requires more dexterity and less sleep. But the Double or Nothing? It is a trick that rewards patience over gymnastics. It does not demand you juggle three balls while reciting Shakespeare. It just demands you stop fighting the string.
Breaking Down the Mechanics
Let’s strip away the mystique. This is not magic. It is geometry.
Step 1: The Breakaway
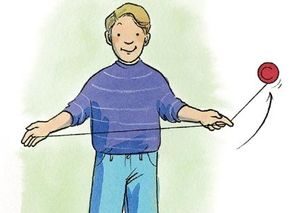
You start exactly where you left off. Throw a standard Breakaway. This is the foundation. If your breakaway is wobbly, nothing else matters. Keep it straight. Keep it tight. Let the yo-yo do its thing. Let it hit the bottom and begin its ascent.
Step 2: The Finger Trap
This is where most people fail. Or rather, where they overthink.
Watch the yo-yo. It is climbing back up the string. But here is the key: wait for it to reach the opposite side of your body. Do not jump at it. Let it swing across.
Now, take your free hand—the one not holding the yo-yo string. Extend your index finger. This is your new anchor point. You are not grabbing the yo-yo. You are not grabbing the string near the yo-yo. You are creating a loop.
Position your finger about three to five inches from the yo-yo itself. Think of it as setting the stage for another Man on the Flying Trapeze, but this time, you are the trapeze artist and the audience. You are the tension.
“The trick isn’t in the speed. It’s in the stillness of the finger.”
Why This Works
The Double or Nothing relies on leverage. By extending that finger three to five inches out, you create a pivot point. The yo-yo swings around that pivot. It creates a figure-eight motion that looks chaotic but is actually highly controlled.
If you go too close to the yo-yo, the string catches. The momentum dies. You look foolish.
If you go too far, the yo-yo doesn’t have enough tension to swing back. It just droops.
Three to five inches. That is the sweet spot. It is not a scientific measurement. It is a feeling. It is the distance where the string feels taut but not tight. Where the yo-yo seems to hang in the air, defying gravity for a split second.
Common Mistakes
- Moving the hand too early. Wait for the opposite side. Let the yo-yo swing fully.
- Clenching the finger. Keep your hand loose. A rigid finger creates friction. Friction kills momentum.
- Looking at the yo-yo. Look at the space between your
The Second Swing: Mastering the Extended Arc
You have just completed the initial loop. Now, the trick demands precision.
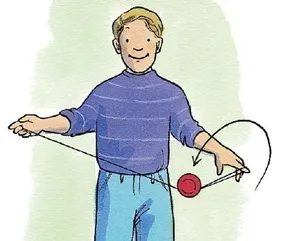
Let the yo-yo swing around the outstretched index finger of your free hand, just as you would for a Man On The Flying Trapeze. But here is the shift. Do not stop there. Allow the yo-yo to make a bigger circle. Swing it around your extended index finger of your yo-yo hand.
This is where most people fumble. The momentum is building. The arc is widening.
Then, let it continue swinging around the index finger of your free hand a second time.
Why does this matter? Because the second pass locks in the rhythm. It sets up the return. If you hesitate here, the yo-yo will drop. If you rush, the string will tangle.
Watch your fingers.
Keep the tension tight. Let the yo-yo do the work.
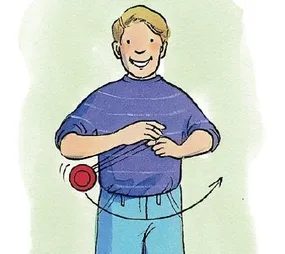
The Double Index Finger Catch
Ready to elevate your yo-yo game? It’s time to lock in a move that looks deceptively simple but requires precise finger placement. The goal here is to catch the yo-yo on one of the strings, specifically positioning it between your two index fingers. Think of this as a variation of the classic Man On The Flying Trapeze catch, but with a twist that changes the leverage and control you have over the toy.
Execution Details
Once you’ve snagged that string, don’t just let it sit there. You need to actively manage the tension. Push your hands closer together. This isn’t just a casual adjustment; it’s about creating a tight, controlled space for the yo-yo to swing. As you bring your hands in, allow the yo-yo to hang slightly below your palms. This downward hang is key. It keeps the loop loose enough to spin freely but tight enough that you haven’t lost control.
“The secret isn’t just catching the string; it’s controlling the space between your hands to dictate the yo-yo’s movement.”
Why This Matters
This position sets you up for a variety of subsequent tricks. By having the yo-yo hang below your hands, you’re essentially resetting your grip for more complex string manipulations. It’s a foundational moment where precision beats speed. If you let the yo-yo dangle too loosely, you’ll lose the snap. If you pull too tight, you’ll stifle the spin. Find that middle ground where the string is taut between your index fingers, and the weight of the yo-yo does the rest.
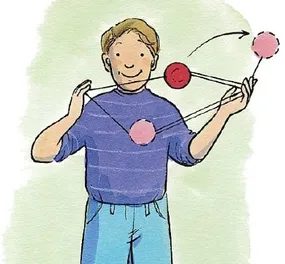
Exiting with a Bang
To actually get out of whatever complex knot you’ve just tied, you need to pull your hands apart. This motion pops the yo-yo straight up into the air. Don’t overthink the release. Just let all that loose string slip off your fingers and watch it wind back up into the yo-yo’s spool. Catch it with your yo-yo hand and smile.
The Bank Deposit Yo-Yo Trick is the perfect way to end an act. It looks clean. It feels satisfying. It’s the ideal finale for anyone who wants to leave an audience wanting more.
Want to learn more yo-yo tricks? See:
-
Yo-Yo Basics
-
Easy Yo-Yo Tricks
-
Intermediate Yo-Yo Tricks
-
Kids Activities
Bank Deposit Yo-Yo Trick
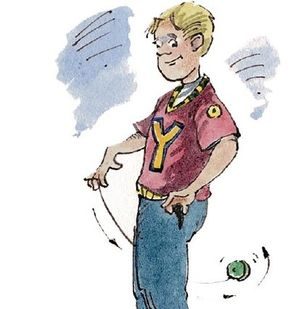

The Bank Deposit Yo-Yo Trick
The Bank Deposit Yo-Yo Trick is an ideal yo-yo trick to finish up a set. If you’re looking for a great trick to end your act, it’s time you made a Bank Deposit!
How to Do the Bank Deposit Yo-Yo Trick:
Step 1: Pull your left pant pocket open as wide as possible.
Step 2: Throw a hard Sleeper between your legs.
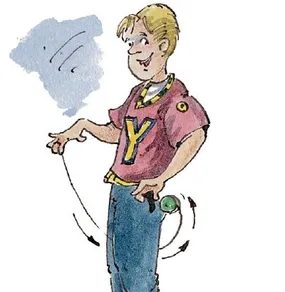

Getting the Yo-Yo Into Your Pocket
Now comes the part that actually requires muscle memory. You have to let that spinning disc swing wide around your leg. It’s a wide arc. You time it so the yo-yo drops right into your pocket.
It won’t happen on the first try.
You might end up with your pants tied in knots or a bruised shin. That’s normal.
Leveling Up Your Gear
If you want to keep getting better, you need to dig into the basics first. You can’t just jump to complex string tricks without mastering the sleep and the return.
Check out Yo-Yo Basics to get your grip right. Then move to Easy Yo-Yo Tricks for simple flourishes. Once you’re bored of those, hit Intermediate Yo-Yo Tricks for more string manipulation.
And if you’re buying this for a kid, look at Kids Activities for age-appropriate starters.
The Custom Pocket Hack
Here’s a secret most beginners don’t know.
The trick fails if your pocket is tight.
You need space for the yo-yo to drop in without catching on the fabric. Regular jeans often fail here. The opening is too small. The lint traps the string.
Old-school players knew this.
They didn’t fight their clothes. They tailored them.
Some experts had custom pants made. Large, open pockets. No button flaps to get in the way. Just a deep hole for the yo-yo to land in.
You don’t need a tailor.
Just wear baggy cargo pants. Or slip a spare handkerchief in there to create a softer landing zone.
Why make it hard on yourself?